IKEv2 with strongSwan
IKEv2 is defined by the Internet Engineering Task Force standard RFC 7296. It uses fixed port numbers. It is therefore easily blocked by censors. Nevertheless, it may work in some countries.
This article shows you how to create an IKEv2 server using strongSwan on Debian 10+/Ubuntu.
In the examples we give, the client is at IP address xx.xx.xx.xx, and the server is at IP address yy.yy.yy.yy. Wherever you see these values in the examples, you will need to change them to match your actual IP addresses. If you do not know your workstation’s IP address, you can determine it by opening a browser and visiting IPchicken.com.
We will also give instructions for the example of a Windows client device.
1. Server
1.1. Install and Configure Firewall
We begin by installing a firewall and configuring it to accept packets using AH protocol and ESP protocol, plus 500/udp and 4500/udp, which will be used with clients behind Network Address Translation. We also masquerade outgoing IP addresses.
Install and start the firewall by issuing the commands that follow:
apt update && apt upgrade -y
apt install nftables -y
systemctl enable nftables
systemctl start nftables
Add the basic firewall rules:
nft add rule inet filter input ct state related,established counter accept
nft add rule inet filter input iif lo counter accept
nft add rule inet filter input ip protocol icmp counter accept
nft add rule inet filter input ip6 nexthdr icmpv6 counter accept
Open port 22 for SSH. If you can restrict the port 22 rule so that only certain source IP addresses are whitelisted for SSH access, then so much the better. For example, if your workstation always has IP address xx.xx.xx.xx:
nft add rule inet filter input tcp dport 22 ip saddr xx.xx.xx.xx/32 counter accept
If you cannot predict your workstation IP address, you will have to open port 22 to the whole world.
Open ports 500/udp and 4500/udp and protocols 50 and 51 for IPsec:
nft add rule inet filter input ip protocol ah counter accept
nft add rule inet filter input ip protocol esp counter accept
nft add rule inet filter input udp dport 500 counter accept
nft add rule inet filter input udp dport 4500 counter accept
Drop all other unsolicited input packets:
nft add rule inet filter input counter drop
Masquerade the outgoing IP address on packets that have come through the VPN:
nft add table nat
nft add chain nat prerouting { type nat hook prerouting priority 0 \; }
nft add chain nat postrouting { type nat hook postrouting priority 100 \; }
nft add rule nat postrouting ip saddr 10.0.8.0/24 masquerade
Save these firewall rules:
nft list ruleset > /etc/nftables.conf
1.2. Allow Forwarding
Now enable packet forwarding in the Linux kernel. Create a new configuration file in /etc/sysctl.d:
vi /etc/sysctl.d/40-ipv4-forward.conf
Insert a single line:
net.ipv4.ip_forward=1
Save the file. Make this change effective immediately.:
sysctl -p /etc/sysctl.d/40-ipv4-forward.conf
1.3. Install Packages
Install strongSwan by entering the command:
apt install strongswan libstrongswan strongswan-pki libstrongswan-standard-plugins libstrongswan-extra-plugins strongswan-swanctl strongswan-charon strongswan-starter strongswan-libcharon libcharon-extra-plugins charon-systemd -y
1.4. Create Certificate Authority Certificate
We will create a self-signed Certificate Authority (CA) certificate.
Issue the command that follows, replacing country US, organization Example, and common name Example CA with your own choices for values:
ipsec pki --gen --outform pem > /etc/swanctl/private/ca.pem
chmod 600 /etc/swanctl/private/ca.pem
ipsec pki --self --ca --lifetime 3650 --in /etc/swanctl/private/ca.pem --dn "C=US, O=Example, CN=Example CA" --outform pem > /etc/swanctl/x509ca/ca.pem
1.5. Create Server Certificate
Generate the server certificate. Issue the next command, replacing Example with your own choice of organization name. Also replace yy.yy.yy.yy wherever it appears by your server’s actual IP address.
ipsec pki --gen --outform pem > /etc/swanctl/private/yy.yy.yy.yy.pem
chmod 600 /etc/swanctl/private/yy.yy.yy.yy.pem
ipsec pki --pub --in /etc/swanctl/private/yy.yy.yy.yy.pem | ipsec pki --issue --lifetime 730 --cacert /etc/swanctl/x509ca/ca.pem --cakey /etc/swanctl/private/ca.pem --dn "C=US, O=Example, CN=yy.yy.yy.yy" --san yy.yy.yy.yy --flag serverAuth --flag ikeIntermediate --outform pem > /etc/swanctl/x509/yy.yy.yy.yy.pem
1.6. Create Client Certificate
Generate the client certificate, similar to the way you generated the server certificate. In the following example, replace win10, example.com, and Example wherever they appear by your own values:
ipsec pki --gen --outform pem > /etc/swanctl/private/win10.pem
chmod 600 /etc/swanctl/private/win10.pem
ipsec pki --pub --in /etc/swanctl/private/win10.pem | ipsec pki --issue --lifetime 730 --cacert /etc/swanctl/x509ca/ca.pem --cakey /etc/swanctl/private/ca.pem --dn "C=US, O=Example, CN=win10.example.com" --san win10.example.com --flag clientAuth --outform pem > /etc/swanctl/x509/win10.pem
1.7. Configure strongSwan
Create a new file for IKEv2 connections with machine certificate authentication:
vi /etc/swanctl/swanctl.conf
Insert a configuration like this. Replace yy.yy.yy.yy by your server’s IP address wherever it appears. Also replace any other values as you wish, for example the virtual IP address pool or the DNS servers.
connections {
  ikev2-pubkey {
    version = 2
    proposals = aes192gcm16-aes128gcm16-prfsha256-ecp256-ecp521,aes192-sha256-modp3072,default
    rekey_time = 0s
    pools = primary-pool-ipv4,primary-pool-ipv6
    fragmentation = yes
    dpd_delay = 30s
    local {
      certs = yy.yy.yy.yy.pem
      id = yy.yy.yy.yy
    }
    remote {
    }
    children {
      ikev2-pubkey-child {
        local_ts = 0.0.0.0/0
        rekey_time = 0s
        dpd_action = clear
        esp_proposals = aes192gcm16-aes128gcm16-prfsha256-ecp256-modp3072,aes192-sha256-ecp256-modp3072,default
      }
    }
  }
}
pools {
  primary-pool-ipv4 {
    addrs = 10.0.8.0/24
    dns = 8.8.8.8,8.8.4.4
  }
  primary-pool-ipv6 {
    addrs = fec3::/120
    dns = 2001:4860:4860::8888,2001:4860:4860::8844
  }
}
secrets {
  private {
    file = yy.yy.yy.yy.pem
  }
}
Save the file.
1.8. Start strongSwan
Start strongSwan with your new configuration:
systemctl restart strongswan-swanctl
1.9. Check strongSwan
Check that strongSwan is active and running:
systemctl status strongswan-swanctl
You many need to type q to quit the status display.
If there are errors you need to check:
journalctl -xe
journalctl -u strongswan-swanctl
1.10. Create Client P12 File
Many types of client prefer a P12 file over separate certificate and key files. A P12 file follows the Public Key Cryptography Standard #12 format, and include keys and certificates in one file.
Convert your client certificate and key to PKCS12 format:
openssl pkcs12 -export -in /etc/swanctl/x509/win10.pem -inkey /etc/swanctl/private/win10.pem -out ~/win10.p12
Make sure you enter and confirm an export password when you are prompted.
Also convert your CA certificate to crt format, which is sometimes preferred by client devices:
openssl x509 -outform der -in /etc/swanctl/x509ca/ca.pem -out ~/ca.crt
Your server work is done for now.
exit
We will continue on your workstation.
1.11. Securely Download Certificates to Workstation
The easiest way to securely download certificates to your final device(s) is to first download them to a workstation on your LAN, where they will be behind a firewall. If necessary, you can then transfer them from the workstation to your final clients, if these client devices are different from your workstation. For onward transfer to mobile devices, it may be convenient to create a secure website that presents the certificate to the final client.
To download to a Linux workstation, go to your workstation and use the scp command. For example:
scp [email protected]:win10.p12 ~/Downloads/win10.p12
scp [email protected]:ca.crt ~/Downloads/ca.crt
To download to a Windows workstation, you can use the pscp.exe command that comes with PuTTY. Here are some samples of the commands. You would enter these into a Windows Command Prompt window (Win+r, type cmd, then press Enter):
"C:\Program Files\PuTTY\pscp.exe" -P 22 [email protected]:win10.p12 Downloads\win10.p12
"C:\Program Files\PuTTY\pscp.exe" -P 22 [email protected]:ca.crt Downloads\ca.crt
2. Windows Client
Since IPsec and IKEv2 are industry-wide standards, they are supported on many platforms. We give the example of a Windows computer as the client.
2.1. Import Certificates
Use the Microsoft Management Console to import the CA certificate and the P12 file. Press the Win+r keys, type mmc, then press Enter.
Do File, Add/Remove Snap-in, then choose Certificates. You must select Computer Account. Select Local computer. Click OK.
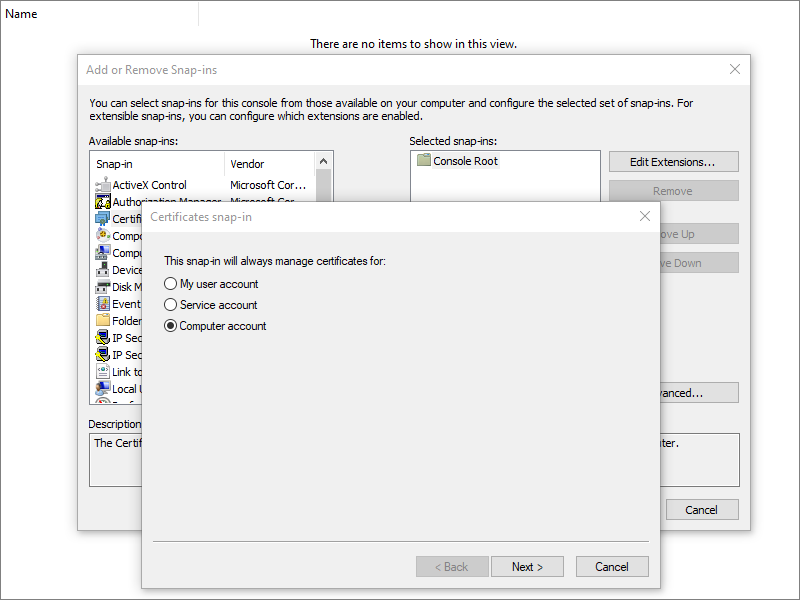
Select Trusted Root Certification Authorities. Do Action > All Tasks > Import. Import your downloaded ca.crt file.

Select Personal. Do Action > All Tasks > Import. Import your downloaded win10.p12 file. You will need to enter the password for the P12 file when you import it.
The client certificate appears under Personal.

Close the Microsoft Management Console. There is no need to save the console settings.
2.2. Add VPN Connection
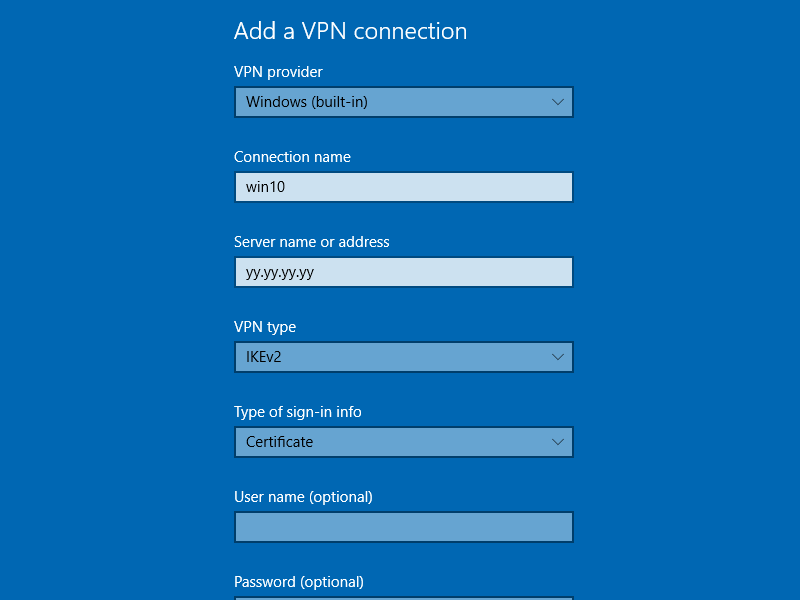
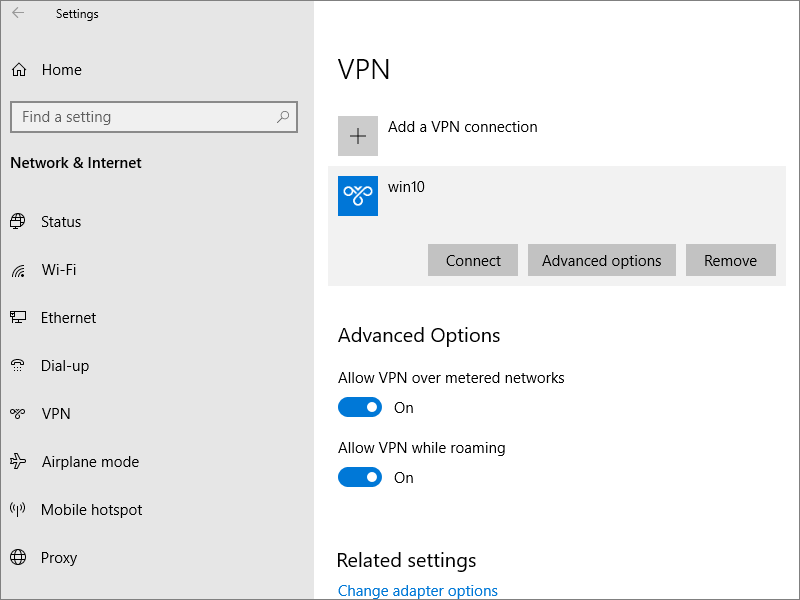
Add the new VPN connection in Settings > Network & Internet > VPN. The VPN provider is Windows (built-in). The Connection name is (for example) win10. The Server name or address in our example is yy.yy.yy.yy. The VPN type is IKEv2. The Type of sign-in info is Certificate.
2.3. Set Authentication Method to Machine Certificate
Once you have added the new connection, check that the authentication method is set to machine certificate. For example, if you named the connection win10, then open Windows PowerShell (right-click on Start menu) and issue the command:
Get-VpnConnection -Name "win10"
If necessary, set the authentication method to machine certificate:
Set-VpnConnection -Name "win10" -AuthenticationMethod "MachineCertificate"
2.4. Enable MODP2048 in Registry
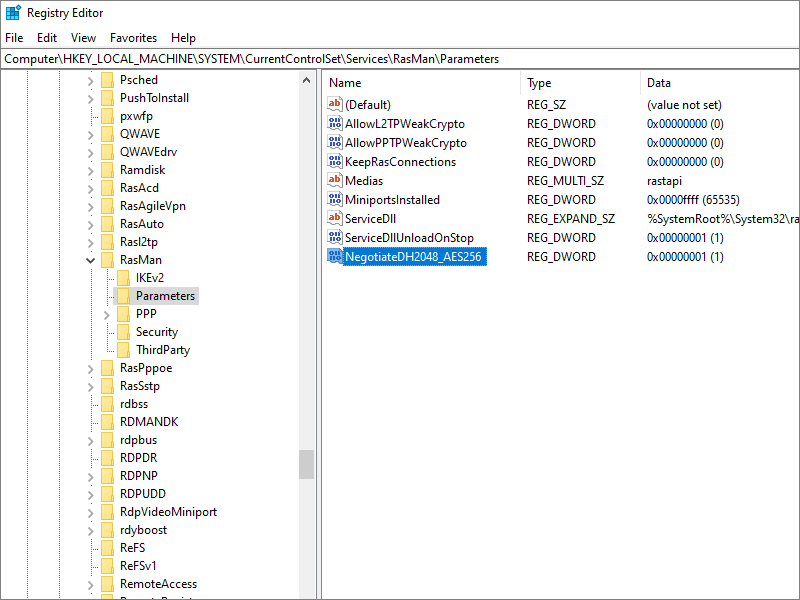
Now edit the registry to allow use of modp2048.
Press the Win+r keys, type regedit, then press Enter. Navigate to HKEY_LOCAL_MACHINE > SYSTEM > CurrentControlSet > Services > Rasman > Parameters.
Insert a new DWORD (32-bit value). The name is NegotiateDH2048_AES256. The value is 1, which means enable AES-256-CBC and MODP-2048.
2.5. Route Traffic through VPN
Route all traffic through your VPN connection as follows.
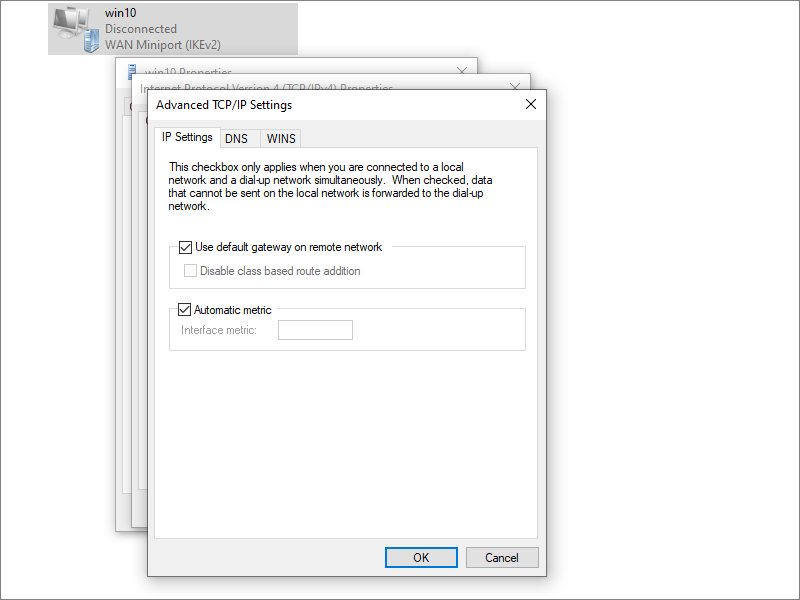
Open the Control Panel > Network and Internet > Network and Sharing Center. Click Change adapter settings.
Select your IKEv2 interface (WAN Miniport named win10 in our example). Right-click, and select Properties. Go to the Networking tab. Select the row for Internet Protocol Version 4 (TCP/IPv4). Click Properties. Click Advanced. Check the box for Use default gateway on remote network.
Close the Control Panel windows.
2.6. Connect
Now you can connect your client to your server from Settings > Network & Internet > VPN. Select your VPN and press Connect.
3. Get Help and Report Issues
For your client device in general, seek support through the normal channels for that device.
For strongSwan, support arrangements are listed on the strongSwan support page.
If you would like instructions for a hardened strongSwan installation, or for iOS and macOS clients, see the blog post by Sun Knudsen.
Updated 2021-06-17